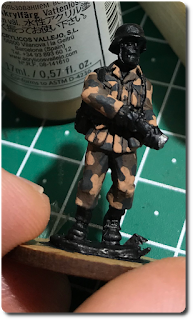
Thus I went for the Oak Leaf pattern for all of these items as this was the most widely distributed at the time.
My painting style is based on the so-called Triad-System or Foundry System in which you use a Shade as the darkest colour. Then you paint over it using what is called a Base Colour (in general the actual colour you want to achieve for the piece you're just painting) leaving the Shade show only in the folds and recesses, followed by a Highlight on the points which will catch the most light. However, I'm using intermediate steps to make the transitions between the different colours much smoother.
Thus typically the steps I use would look somewhat like:
Shade - 50/50 mix Shade/Base - Base - 50/50 mix Base/Highlight - Highlight
In general what I'll give you in this tutorial is the three colours as if used as simple triads. If you prefer the more elaborate approach just add in the intermediate steps mentioned above, or start from an even darker Shade or end with a lighter Highlight.
If fractions in brackets are given these are just approximations. Just try what looks best to you.
Note: I haven't documented every single step for this Colour Guide, so you might want to refer to some of the guides I wrote earlier. To do so just go to the top of the page where you'll find a link to a page containing direct links to all the Colour Guides I wrote to date.
Step 1:
The uniform is painted using a base coat of VMC 70.871 Leather Brown. As I won't add any highlights later on I made doubly sure to let the black primer show in the recesses and seams thus adding some depth
Step 2:
This was followed by random spots of VMC 70.876 Brown Sand. Again I stop at seams and crevasses to add interest and hint at the uniform being sewn together from printed cloth instead of camo being painted on afterwards like with the British Denison Smocks for example
Step 3:
Now dark spots are randomly applied next and partially on top of the light spots using AC Fieldgrey 2nd Shadow. Any other dark-greyish green can be used just as well. Don't use pure black though as the contrast would be too stark
Step 4:
Now the last layer of bigger splodges is applied using VMC 70.881 Yellow Green. As before make sure not to cover your black lining but instead let the different coloured spots slightly overlap
Step 5:
Now comes the fun part. The small dots. Using a brush with a sharp tip I painted small dots of VMC 70.871 Leather Brown over the brighter (i.e. Sand Brown and Yellow Green) spots. Don't bother with spots on the Dark Green as they'd disappear due to lack of contrast
Step 6:
This is followed by small dots of AC Fieldgrey 2nd Shadow. Don't over do it as less is sometimes more
Step 7:
Now in a final step small dots of VMC 70.876 Brown Sand and VMC 70.857 Golden Yellow are painted on top of the darker areas. It's not necessary to paint dots on the brighter areas as with the dark spots before these would disappear do to lack of contrast.
So, there you go! Quick and easy Pea Dot pattern camouflage for your SS thugs.


